Add Reverse Proxy & Encrypt Arclight with Let’s Encrypt
As a security recommendation, it is always a good practice to
encrypt the data sent across the Internet. Use Let’s Encrypt to create a free validated SSL
certificate for your domain. We will using the domain
mydomain.com for this example. The new config file should end with
the .conf extension and be located in the
/etc/apache2/sites-available/ directory. To create a
new file for your domain use the following command, and be sure to
change the domain name:
sudo nano /etc/apache2/sites-available/mydomain.com.confRemove everything and paste the below configuration along with your domain name.
Working: The first line below
<VirtualHost *:80> tells Apache that this
configuration file will be used for HTTP traffic. When we
configure Let’s Encrypt, the HTTPS connection (port 443) will be
configured automatically. The second line ServerName mydomain.com
tells Apache what domain name it should be listening for to apply
this configuration. The third line DocumentRoot
/var/www/html/arclight/ indicates the root location
of the web site files and that should be the filepath for your
files.
<VirtualHost *:80>
  ServerName mydomain.com
  DocumentRoot /var/www/html/arclight/
  <Location "/api/">
          ProxyPreserveHost On
          ProxyPass http://localhost:3000/
          ProxyPassReverse http://localhost:3000/
  </Location>

  <Directory /var/www/html/arclight>
    Options Indexes FollowSymLinks
    AllowOverride All
    Require all granted
  </Directory>
  RewriteEngine on
</VirtualHost>
Once you add the above information to the configuration file and save it, we will then need to enable the configuration file in Apache using the a2ensite command. To do that run the following command, be sure to use your domain name:
sudo a2ensite mydomain.com.confWhen Apache is only used for the arclight it would be a good idea to disable the default configuration file that comes with the install of Apache. To do that use the command:
sudo a2dissite 000-default.confYou will need to restart/reload the Apache web server:
sudo systemctl reload apache2To automate the Let’s Encrypt certificate using Apache we will need to install the python3-certbot-apache package. Use the following command:
sudo apt install python3-certbot-apacheTo create the SSL Certificate and Apache configuration file run the following command, Select your domain and choose No redirect in the last one.
sudo certbot --apacheRestart arc api to save changes.
pm2 kill
pm2 flush
cd /var/www/html/arclight
pm2 start ecosystem.config.js
Now login to your Arclight Dashboard. Go to the settings page and
add the location of the Let’s Encrypt certificate file and key
file and submit your changes. Below is the location created for
mydomain.com Certificate file:
/etc/letsencrypt/live/mydomain.com/fullchain.pem
Key file:
/etc/letsencrypt/live/mydomain.com/privkey.pem
The permissions for the certificates are tied to the root user.
There will need to be a permission change on the
/etc/letsencrypt/live folder as well as /etc/letsencrypt/archive.
We can change the permission to 755 (rwxr-xr-x) to allow the
Arclight to be able to read the information. Run the following
commands:
sudo chmod 755 /etc/letsencrypt/livesudo chmod 755 /etc/letsencrypt/archive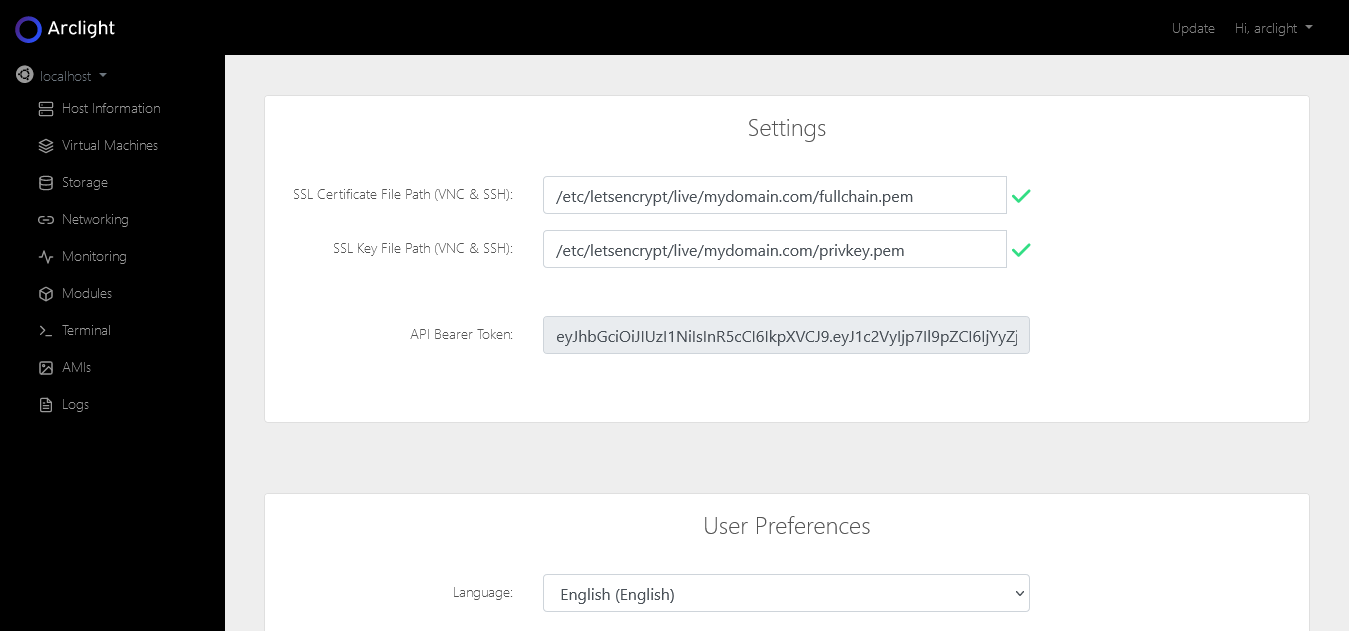
Restart your server or restart the python process tied to noVNC to apply the certificate and key files. If you decide to restart the service you should be able to determine which process id (PID) is using port 6080. Use the following command:
sudo netstat -tulpn | grep 6080Then after determining the PID number, kill the process. For example, if it was PID 1386, I would use the command:
sudo kill 1386That's it, now you can use the noVNC web console to connect to your vms.